Seasonal Gear Maintenance: Expert Q&A

Your outdoor gear takes a beating – rain, dirt, sweat, and constant use. Without care, it won’t last long or perform well. Here’s the deal: regular maintenance extends your gear’s life, keeps you safe, and reduces waste. Neglecting it can lead to clogged waterproof membranes, mold, or damaged materials.
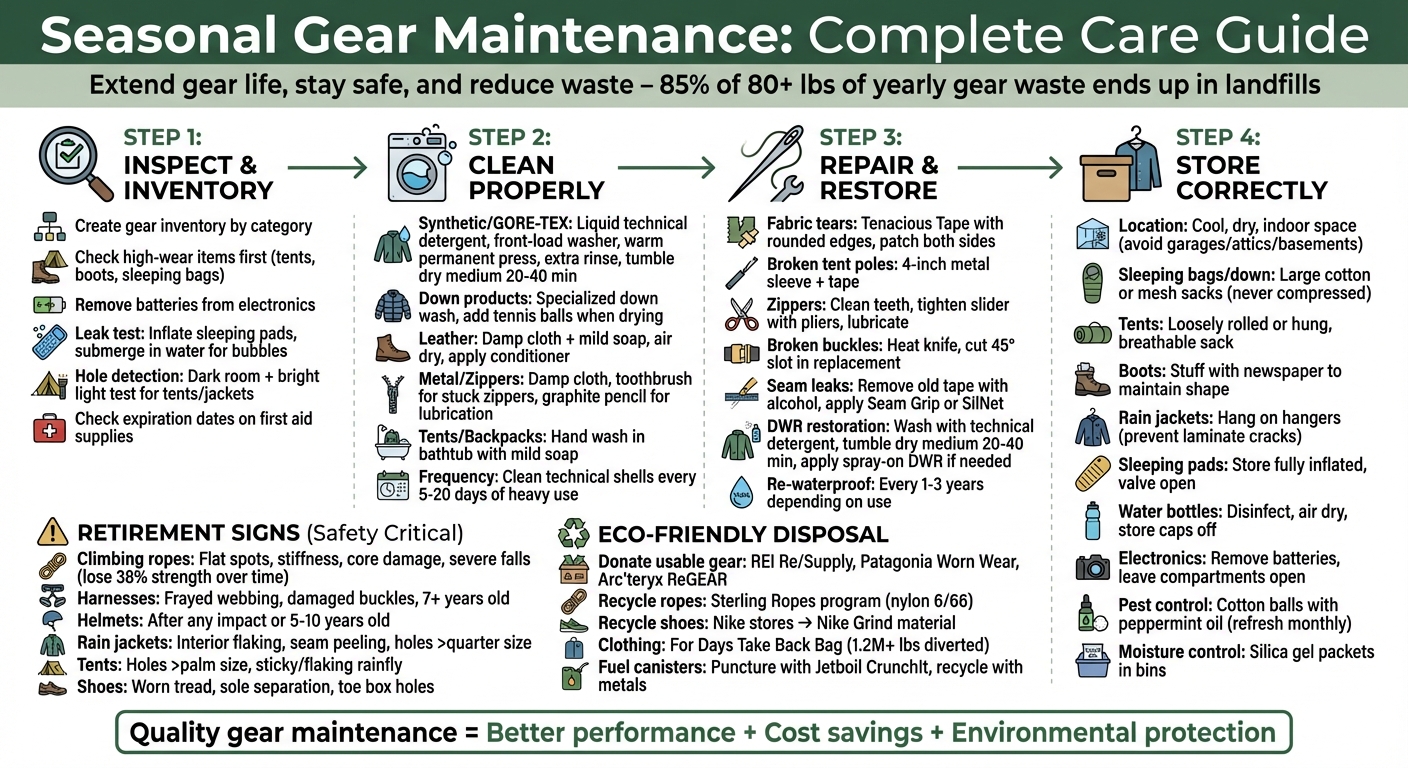
Key Takeaways:
- Cleaning: Use proper detergents for technical fabrics, condition leather, and avoid harsh chemicals.
- Drying & Storage: Fully dry gear before storing in cool, dry places. Avoid compression sacks for items like sleeping bags and tents.
- Repairs: Fix tears, reapply waterproof coatings, and maintain zippers to prevent failures.
- Replacements: Retire gear when safety is compromised, like worn climbing ropes or delaminated rain jackets.
- Eco-Friendly Disposal: Donate usable items, recycle materials like ropes and shoes, and avoid landfills.
Why It Matters: The average American throws out 80+ pounds of gear yearly, with 85% ending up in landfills. Simple steps – like cleaning properly and storing correctly – can make your gear last years longer while cutting down on waste. Ready to dive into the details? Let’s go.
Complete Seasonal Gear Maintenance Workflow: Inspect, Clean, Repair, and Store
Getting Ready for Seasonal Maintenance
Creating an Inventory and Inspecting Your Gear
Before tackling cleaning or repairs, start by organizing all your gear in one place. This ensures nothing gets overlooked. As Andrew Skurka aptly says:
"Think of your gear closet as a garden you need to tend to."
Sort your gear into categories to make inspections easier and more efficient. Begin with items that face the most wear and tear – like tents and boots that come into contact with the ground, or sleeping bags and base layers that absorb sweat. For electronics like headlamps and GPS devices, remove the batteries to prevent corrosion. Check the expiration dates on first aid supplies and take inventory of essentials like tent stakes to ensure nothing is missing.
For leak checks, inflate sleeping pads and briefly submerge them in water to spot air bubbles. Similarly, to find tiny holes in tents or rain jackets, set them up in a dark room and shine a bright light on the outside – any small punctures will show through.
Documenting wear and tear during this process helps identify items that might fail under seasonal stress. Once you’ve inspected and inventoried everything, it’s time to consider how different seasons impact your gear’s performance.
How Seasons Affect Your Gear
Seasonal changes can take a toll on even the most dependable equipment, making thorough inspections a must. Moisture, in particular, is your gear’s worst enemy, especially during winter storage. Waterproof coatings are prone to breaking down when exposed to damp conditions, a process called hydrolysis. This can result in a strong, unpleasant odor. As Terry Breaux, Product Manager at MSR, describes:
"Have you ever pulled a tent out of the stuff sack and it smells like vomit? That’s the smell of moisture breaking down the waterproof coating."
Even slightly damp gear can lead to mold growth and damage to waterproof laminates. On the flip side, summer heat poses its own risks. Leaving gear in a hot car, where temperatures can exceed 160°F, may melt adhesives on sleeping pads or compress closed-cell foam. UV rays from sunlight weaken fabrics over time, while dirt and grit act like sandpaper, wearing down fibers with every use. Sweat and body oils can also clog breathable membranes, reducing their effectiveness.
To keep your gear in top condition, make sure it’s completely clean and dry before storing it. This simple step is crucial to ensure your equipment is ready to perform when the next adventure calls.
Cleaning and Restoring Your Gear
Cleaning Methods for Different Materials
Different materials require specific cleaning approaches to maintain their performance and longevity. For synthetic technical fabrics like GORE-TEX, it’s best to use a liquid technical detergent rather than regular household soap. As Outdoor Research points out:
"Standard detergents will leave a hydrophilic residue behind that will mask the DWR’s effectiveness."
Wash these items in a front-loading machine on a warm, permanent press cycle. Be sure to include an extra rinse to remove all detergent residue. After washing, tumble dry on medium heat for 20–40 minutes to reactivate the DWR (durable water repellent) coating.
Leather items demand a more delicate touch. Wipe them down with a damp cloth and mild soap, then air-dry away from direct heat. Once dry, apply a leather conditioner to keep the material supple.
For down products, use a specialized down wash in a front-loading machine. Toss in two tennis balls during the drying cycle to help restore the loft of the down.
Metal components and zippers should be cleaned with a damp cloth. If a zipper gets stuck, use a dry toothbrush to clean the teeth, then apply a graphite pencil or a light layer of petroleum jelly for lubrication. Avoid heavy-duty lubricants like WD-40, as they can damage technical fabrics. Backpacks and tents, on the other hand, are best cleaned by hand in a bathtub with mild soap to protect their waterproof coatings.
How often should you clean your technical shells? Every five to twenty days of heavy use is a good rule of thumb to prevent body oils from clogging their breathable membranes. Ken Knapp, REI Editor Emeritus, explains:
"Grit left in place works a little like the grit in sandpaper, gently abrading fibers in materials whenever you’re using or wrangling your gear."
Once your gear is clean, drying it properly is crucial to avoid mold and ensure it performs as intended.
Proper Drying and Storage After Cleaning
Drying your gear the right way is just as important as cleaning it. Ensuring every item is completely dry before storage helps prevent mold and extends its lifespan. For tents, set them up in a dry, shaded area for one to two days before storing. Always store tents loosely in a breathable cotton or mesh sack – compression stuff sacks can lead to hydrolysis over time. Sleeping bags should be air-dried on a clothesline for at least 24 hours in low-humidity conditions. Down sleeping bags benefit from tumble drying on low heat with a couple of tennis balls to maintain their loft.
Footwear dries best when you remove the insoles and stuff the interior with newspaper. This absorbs moisture and helps the shoes keep their shape. For sleeping pads, cycle them several times to expel any trapped moisture, then store them fully inflated with the valve open. Water bottles and hydration bladders should be disinfected, air-dried, and stored with their caps off to allow for proper airflow.
For electronics like headlamps and GPS units, remove the batteries during storage to avoid corrosion. Leave the battery compartments open for ventilation. Liquid-fuel stoves should be stored with the fuel bottle empty and uncapped to prevent rust or corrosion. Arc’teryx offers a simple but important reminder:
"The most important aspect of storage is to keep your technical clothing out of the sun… and protected from moisture, which can break down materials and cause mildew and mold."
Taking these steps ensures your gear stays in top condition and is ready for your next adventure.
Repairing and Upgrading Your Gear
Common Repairs for Adventure Gear
Fixing your gear promptly doesn’t just keep it functional – it also ensures it performs well on your adventures. Many common gear issues can be resolved with a few basic tools and a little know-how. For instance, tents often suffer from fabric tears, broken poles, or stubborn zippers. Clothing and sleeping bags might develop ember holes, lose their insulation, or have broken buckles. Footwear? The usual culprits are delaminating soles or cracked leather caused by neglecting proper conditioning.
Kevin McGowan, NOLS Gear Manager, reminds us:
"operator error is the cause of 99 percent of our tent failures".
This highlights that many mishaps can be avoided with proper care. But when damage does occur, here’s how to fix it: For fabric tears, use Tenacious Tape with rounded edges and patch both sides of the tear for extra durability. If a tent pole snaps, slide a 4-inch metal repair sleeve over the break and secure it with tape. Loose shock cords? Remove the pole’s end cap, trim about 5 inches of slack, and re-knot.
Zippers can be tricky, but a little maintenance goes a long way. Clean the teeth with a toothbrush and water, then tighten a loose slider using pliers. Lubricate with a graphite pencil or specialized zipper wax – skip WD-40, as it can harm technical fabrics. For broken buckles, use a heated knife to cut a 45-degree slot in a replacement buckle, allowing it to slide onto the existing webbing. Seam leaks? Remove old, flaking tape with rubbing alcohol and apply a liquid sealer like Seam Grip. For silicone-treated fabrics, opt for SilNet for a stronger bond.
Reapplying Waterproofing and Protective Coatings
Once repairs are done, don’t forget to restore your gear’s protective coatings. If water no longer beads on your rain jacket and the fabric starts to "wet out", it’s time to refresh the Durable Water Repellent (DWR) coating. Start by washing the item with a technical detergent – household soaps can leave residues that compromise waterproofing. Heidi Dale Allen, Vice President of Marketing at Nikwax, advises:
"You wouldn’t wax a dirty car, so do not try to waterproof a dirty piece of gear".
After cleaning, toss the jacket in the dryer on medium heat for 20–40 minutes. This can reactivate the existing DWR. If the water still doesn’t bead, apply a spray-on DWR like Nikwax TX.Direct, focusing on high-wear areas such as shoulders and spots under backpack straps. For tents that spend a lot of time in the sun, use a UV-protectant treatment like Nikwax Tent & Gear SolarProof to prevent fabric damage. Generally, most gear benefits from re-waterproofing every one to three years, depending on how often it’s used.
Eco-Friendly Storage Solutions
Selecting the Right Storage Location
Where you store your gear matters just as much as how you store it. The best place is a dry, cool, indoor area like a closet or a dedicated gear room. These conditions help safeguard your equipment from its worst enemies: moisture and temperature fluctuations. Ken Knapp, Editor Emeritus at REI, underscores this point:
"Quality gear can command a premium price, so caring for it helps protect your investment – and the planet for that matter, because well-cared-for gear is likely to endure longer without needing replacement".
Steer clear of garages, attics, and unfinished basements whenever possible. These spaces often experience extreme temperature changes and high humidity, which can lead to mold growth or hydrolysis – a chemical reaction that breaks down waterproof coatings. If a basement is your only option, NEMO Equipment suggests using a dehumidifier during the summer to control moisture levels. Also, keep your gear out of direct sunlight, as UV rays can degrade ultralight fabrics and water-repellent finishes over time.
For a natural approach to pest control, skip chemical solutions. Instead, place cotton balls soaked in peppermint oil around your storage area, refreshing them monthly to create a rodent-repelling barrier. Adding silica gel packets inside storage bins is another smart move – they help absorb any lingering moisture and keep your gear dry. Once you’ve secured the right storage spot, the next step is choosing materials that are both effective and environmentally friendly.
Using Eco-Friendly Storage Materials
The materials you use to store your gear can make a big difference in both its longevity and your impact on the environment. Natural, breathable fabrics like cotton and mesh work best for long-term storage. For instance, sleeping bags and down jackets should be stored in large cotton laundry bags or mesh sacks – steer clear of compression sacks, as they can crush insulation and trap moisture.
For boots, stuff them with old newspapers to help them keep their shape and wick away any dampness. When it comes to organizing smaller items, look for storage bins made from recycled plastic. These bins are not only eco-conscious but also practical. Options range from $44.99 for a 4-pack of 35-quart file totes to $99.99 for 144-quart heavy-duty bins, allowing you to categorize gear (like cooking supplies, first aid kits, or shelter essentials) while keeping it safe from dust and pests.
Performance clothing like rain jackets and waterproof pants should be hung on hangers in a cool, dry closet rather than folded or crumpled into a bin. This helps prevent cracks in waterproof laminates. Similarly, tents should be stored loosely rolled or hung up, never tightly compressed, to avoid damaging seam tape or fabric.
sbb-itb-289f5f2
When to Retire and Replace Gear
Signs Your Gear is Beyond Repair
Figuring out when it’s time to replace your gear isn’t always straightforward, but some signs are too serious to ignore – especially when it comes to equipment that keeps you safe. For climbing ropes, it’s time to retire them if you notice flat spots, stiffness, visible core damage, or if they’ve been through a severe fall. Studies show that ropes can lose up to 38% of their strength over decades of use. Harnesses should be retired if the structural webbing is frayed, buckles are damaged, or if they’ve been in use for seven years, even if they appear fine.
Helmets, whether for climbing or biking, need replacing after any significant impact, even if there’s no visible damage. They also have a general lifespan of 5–10 years. Rain jackets should be replaced if the interior starts flaking, seams peel apart, or if rips are larger than a quarter. Tents are ready for retirement when holes are bigger than your palm or when the rainfly shows signs of sticky residue or flaking, which usually indicates delamination. As for hiking and running shoes, replace them when the tread is worn down, the sole separates from the upper, or holes appear in the toe box.
Joe Pasteris, an editor at REI Expert Advice, puts it simply:
"Knowing when to retire your climbing gear isn’t an exact science… when in doubt, err on the side of caution and retire it".
Before passing along used gear, apply the "Friend Test": if you wouldn’t feel comfortable giving it to a friend, it’s better to retire it than risk someone else’s safety. Once gear no longer meets safety standards, look into responsible ways to dispose of it.
Donating and Recycling Old Gear
If your gear is no longer safe for you, that doesn’t mean it’s destined for the landfill. Usable items in good condition can often be donated or resold. Programs like REI Re/Supply, Patagonia Worn Wear, Arc’teryx ReGEAR, and The North Face Renewed give gently used gear a second life by refurbishing or reselling it. Local gear libraries and groups like the Gear Fund Collective also help make outdoor adventures more accessible by distributing donated equipment to underrepresented communities.
For items that are beyond saving, recycling programs can help. Sterling Ropes accepts retired climbing ropes made from nylon 6 or nylon 66 to keep them out of landfills. Worn-out athletic shoes can be dropped off at participating Nike stores, where they’re turned into Nike Grind material for playgrounds and tracks. The For Days "Take Back Bag" program has already diverted over 1.2 million pounds of clothing and gear from landfills.
It’s worth noting that life-safety gear like helmets or ropes that have been compromised by falls should never be donated or resold. To ensure they’re not reused accidentally, clearly mark them as unsafe or destroy them. For empty fuel canisters, tools like the Jetboil CrunchIt can puncture them for safe recycling with mixed metals. And remember, synthetic and chemically treated materials can take up to 200 years to break down in a landfill, so proper disposal is essential to help protect the environment.
Seasonal Bike Maintenance/Tune-Up: 4 Things Riders Miss
Conclusion
Taking care of your gear isn’t just about keeping it looking good – it’s about protecting your investment, staying safe, and cutting down on unnecessary waste. When you maintain high-quality gear, you’re saving yourself the cost of frequent replacements. Even more importantly, you’re ensuring that your equipment performs when you need it most.
Here’s a startling fact: in the U.S., the average person throws away over 80 pounds of clothing and outdoor gear every year. Shockingly, 85% of that ends up in landfills, where it can take hundreds of years to break down. Simple habits like regular cleaning, using the right detergents, and storing gear without compressing it can keep it functional for years. These practices not only extend the lifespan of your gear but also help it perform at its best when you’re out in the elements.
Small maintenance steps can make a big impact. For example, reactivating DWR coatings by tossing your jacket in the dryer for a few minutes, removing batteries from devices during the off-season, or fixing sticky zippers before they fail entirely. Technical fabrics need to stay clean and free of oils and dirt to maintain their breathability. Using proper cleaning products and storing gear correctly helps preserve the advanced materials and craftsmanship that go into today’s outdoor equipment. Whether it’s a waterproof jacket, a down sleeping bag, or climbing gear, taking care of it means better performance when it matters most.
As Outdoor Research puts it, “A long-lasting product is a sustainable product”. By making gear care a habit, you’re not just extending its life – you’re also contributing to your adventures and helping the environment. In the end, proper gear maintenance is a win for your safety, your wallet, and the planet.
FAQs
How often should I clean and reapply waterproofing to my outdoor gear?
To ensure your gear performs at its best, aim to clean your waterproof jacket every 4–6 weeks if you’re using it on regular weekend outings, or after about 7–10 wears. For your boots, an annual deep clean during maintenance season works well. Don’t forget to reapply waterproofing to items like jackets and tents every 2–3 years. However, if you’re using them heavily and notice water isn’t repelling as it should, refresh the waterproofing every 3–4 months. Keeping up with these simple steps will keep your gear ready for all your adventures!
What are the most eco-friendly ways to dispose of old outdoor gear?
The smartest way to cut down on waste? Make your gear last longer. Start by tackling minor fixes – repair broken zippers, patch up small tears, or refresh worn-out waterproofing. Got gear you don’t need anymore but still works? Think about donating it to a local gear library, nonprofit, or community swap. Another option? Resell gently used items through online marketplaces or secondhand programs.
If repairs, donations, or resale aren’t in the cards, see if the manufacturer or retailer has a recycling program. Many outdoor brands now recycle synthetic fabrics into new materials. Feeling crafty? Repurpose old gear for DIY projects – like transforming a sleeping bag into a cozy dog bed. And if none of these options work, dispose of the item responsibly to keep waste to a minimum.
Looking for more ideas? Check out Take More Adventures for practical tips on finding eco-friendly solutions tailored to your gear.
How do I know when my gear is beyond repair and needs to be replaced?
Determining whether your gear has reached the end of its usefulness often boils down to a few key signs. Start by checking for visible damage – things like ripped seams, broken zippers, or cracked components. These issues can make your gear unsafe or unusable. If essential features, such as waterproofing or insulation, have stopped working and can’t be restored through repairs, it’s probably time to move on to a new piece.
Another factor to weigh is the age of the gear. Most manufacturers provide a suggested lifespan for their products, and using them beyond that period could compromise both safety and performance. If repairs would cost more than the gear is worth or fail to bring it back to full functionality, replacing it is the smartest way to ensure you’re ready and safe for your next adventure.